How to make Contact Form in Node.js

Node.js Tutorial on Server-side Form Validation How to Send an Email in Node.js using Nodemailer In this tutorial, we will learn how to ...

Node.js Tutorial on Server-side Form Validation


How to Send an Email in Node.js using Nodemailer


In this tutorial, we will learn how to make a contact form in Node.js and how to server-side validate form data and send an email from Node.js application.

To create a contact form in Node.js, we will be using the following technologies:

  • Express: Express is a Node.js web application framework that provides a set of features for building web applications.
  • Body-parser: Body-parser is a Node.js middleware that parses incoming request bodies in a middleware before your handlers, available under the req.body property.
  • Express-validator: Express-validator is a set of express.js middlewares that wraps validator.js validator and sanitizer functions.
  • Nodemailer: Nodemailer is a module for Node.js applications that allows you to send emails from your application.

How to make Contact Form in Node.js


Let's start by installing these dependencies using the following command:


npm install express body-parser express-validator nodemailer ejs


Next, create a file named app.js and add the following code:


const express = require('express');

const bodyParser = require('body-parser');

const { check, validationResult } = require('express-validator');

const nodemailer = require('nodemailer');

const ejs = require('ejs');

const app = express();

app.use(bodyParser.urlencoded({ extended: true }));

app.set('view engine', 'ejs');

//middleware for parsing JSON in request body
app.use(express.json());

app.get('/', (request, response) => {

	response.render('contact', { errors : '' });

});

app.post('/send', 
	[
		check('name').notEmpty().withMessage('Name is required'),
		check('email').isEmail().withMessage('Invalid Email Address'),
		check('subject').notEmpty().withMessage('Subject is required'),
		check('message').notEmpty().withMessage('Message is required')
	], (request, response) => {

		const errors = validationResult(request);

		if(!errors.isEmpty())
		{
			response.render('contact', { errors : errors.mapped() });
		}
		else
		{
			const transporter = nodemailer.createTransport({
				service : 'Gmail',
				auth : {
					user : 'povonteblog@gmail.com',
					pass : 'write your Google App Password'
				}
			});

			const mail_option = {
				from : request.body.email,
				to : 'jm6078390@gmail.com',
				subject : request.body.subject,
				text : request.body.message
			};

			transporter.sendMail(mail_option, (error, info) => {
				if(error)
				{
					console.log(error);
				}
				else
				{
					response.redirect('/success');
				}
			});
		}
});

app.get('/success', (request, response) => {

	response.send('<h1>Your Message was Successfully Send!</h1>');

});

//start server
app.listen(3000, () => {

	console.log('Server started on port 3000');

});


Here, we have defined a GET route for rendering the contact form using ejs view engine. And, we have defined a POST route for processing the form data.

In the POST route, we have used express-validator to validate the form data. If there are any validation errors, we render the contact view with the error messages. Otherwise, we use nodemailer to send an email to the recipient email address.

Let's create a contact.ejs view file under the views folder with the following code:


<!DOCTYPE html>
<html>
<head>
    <meta charset="utf-8">
    <title>Node.js Server Side Validation</title>
    <link href="https://getbootstrap.com/docs/5.1/dist/css/bootstrap.min.css" rel="stylesheet" integrity="sha384-1BmE4kWBq78iYhFldvKuhfTAU6auU8tT94WrHftjDbrCEXSU1oBoqyl2QvZ6jIW3" crossorigin="anonymous">
</head>
<body>
    <div class="container mt-5 mb-5">
        <h1 class="text-warning text-center"><b>Node.js Tutorial - How to Send an Email</b></h1>
        <div class="col-md-6 mt-3 mb-3">
            <div class="card">
                <div class="card-header">Contact Form</div>
                <div class="card-body">

                    <form method="post" action="/send">
                        <div class="mb-3">
                            <label for="name">Name</label>
                            <input type="text" name="name" class="form-control" />
                            <% if(errors && errors.name) { %>
                            <span class="text-danger"><%= errors.name.msg %></span>
                            <% } %>
                        </div>
                        <div class="mb-3">
                            <label for="email">Email</label>
                            <input type="text" name="email" class="form-control" />
                            <% if (errors && errors.email) { %>
                            <span class="text-danger"><%= errors.email.msg %></span>
                            <% } %>
                        </div>
                        <div class="mb-3">
                            <label for="subject">Subject</label>
                            <input type="text" name="subject" class="form-control" />
                            <% if (errors && errors.subject) { %>
                            <span class="text-danger"><%= errors.subject.msg %></span>
                            <% } %>
                        </div>
                        <div class="mb-3">
                            <label for="message">Message</label>
                            <textarea name="message" class="form-control"></textarea>
                            <% if(errors && errors.message) { %>
                            <span class="text-danger"><%= errors.message.msg %></span>
                            <% } %>
                        </div>
                        <button type="submit" class="btn btn-success">Send Message</button>
                    </form>

                </div>
            </div>
        </div>
    </div>
</body>
</html>


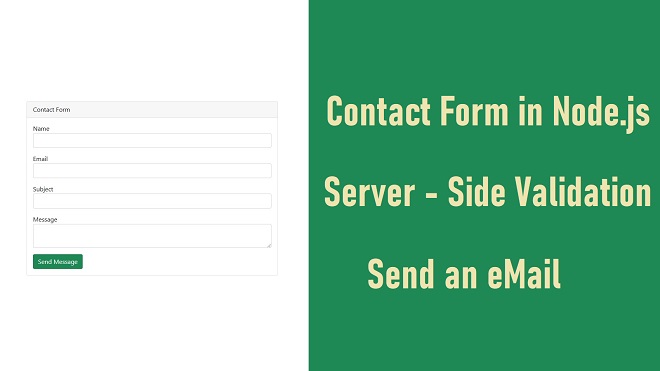
In this view file, we have created a simple HTML form with fields for name, email, subject, and message. We have also used Bootstrap classes for styling the form.

We have also added a condition in the view to check if there are any validation errors. If there are any errors, we will display the error message next to the corresponding field.

Conclusion


In this tutorial, we learned how to create a contact form using Node.js in which we have cover how to validate the form data on the server-side. We used the Express.js framework and the Nodemailer package to send an email from the Node.js application.

Server-side validation of form data is essential to prevent invalid or malicious data from being submitted to the server. Nodemailer is a powerful package that can be used to send emails from Node.js applications.

With this knowledge, you can now create more complex forms and implement server-side validation for them and sending an email from Node.js Application.
COMMENTS

Nama

Add,1,Ajax,2,ajax tutorial,1,Ajax with javascript,1,Ajax with node.js,1,application,2,array,1,array to string,1,array to string conversion nodejs,1,array to string in node js,1,array to string nodejs,1,Asynchronous JavaScript,1,authentication,1,authentication node js,1,authorization,1,availability,1,backend,1,bootstrap offcanvas dynamic content,1,bootstrap offcanvas dynamic content node.js,1,bootstrap offcanvas dynamic data,1,bootstrap offcanvas remote dynamic content,1,cart,1,centos 7,1,centos7,1,check,1,contact form node js,1,contact form nodemailer,1,contact us form node,1,conversion,1,create,1,crud,4,crud application,1,crud operation in node js,1,crud operation in node js with mysql,1,CSS,1,data,1,database,1,databases,1,datatables,1,DataTables integration in React.js,1,date range,1,delete,2,download,1,drag &amp; drop,1,drag and drop,1,drag and drop files,1,drag and drop multiple file,1,drag n drop,1,dynamic dropdown in react js,1,dynamic dropdown in react.js,1,ecommerce,2,edit,1,educational project,1,email address,1,email verification,1,email verification using jwt,1,express,3,expressjs,1,fetch,1,file upload,1,file upload in node js,1,files,1,filter,1,Front-end development tutorial,1,Frontend,1,GET,1,how to send email using node js,1,how to send emails in node js,1,html,1,html 2 pdf,1,html to pdf,1,html to pdf node,1,insert,2,insert data in mysql node js,1,Javascript,3,JavaScript tutorial,1,join array nodejs,1,js,1,json,1,jwt,3,jwt authentication,2,jwt authentication node js,1,jwt authentication php,1,jwt email verification,1,jwt login,1,jwt login php,1,jwt php example,1,jwt token,1,jwt token email verification,1,laravel 10,1,laravel 10 tutorial,1,laravel datatables,1,laravel datatables date range filter,1,laravel date filter,1,laravel date range filter,1,last insert id in node,1,learn reactjs,1,linux,1,live,2,live check email address availability,1,live search,1,load more data on click,1,load more data on click javascript,1,load more javscript node.js,1,load more nodejs,1,load more results,1,load more results with node js and ajax,1,login,1,merge 2 arrays in node js,1,merge array in nodejs,1,merge array node,1,merge two array in node js,1,MongoDB,1,mongodb crud,1,mongodb crud operations,1,multer,1,multiple file upload,1,mysql,7,mysql 8,1,mysql tutorial,1,mysql8,1,node,3,node js,8,node js array merge,1,node js array to string,1,node js crud,2,node js crud mysql,1,node js crud operation with mysql,1,node js load more pagination,1,node js mongodb crud,1,node js mysql last insert id,1,node js tutorial,2,node mongodb crud,1,node mysql get last insert id,1,node pdf,1,node.js,8,node.js array,1,node.js crud,1,node.js mysql,1,node.js tutorial,2,nodejs,9,nodejs array,1,nodejs array merge,1,nodejs create pdf,1,nodejs crud,1,nodejs pdf,1,nodejs pdf create,1,nodejs programming,1,offcanvas,1,open source,1,Optimizing web application performance,1,parking management system,1,parking management system in php,1,parking management system project,1,password,1,pdf-creator-node,1,php,3,php jwt authentication example,1,php jwt login,1,php login jwt,1,php parking management system,1,php project,1,PHP server-side processing,1,populate dropdown from database,1,programming tutorial,1,project,1,Puppeteer,1,Puppeteer HTML to PDF,1,React,1,react file upload,1,react js,2,react js dynamic dropdown,1,react js file upload validation,1,react js tutorial,1,react php myql,1,React.js,1,react.js dependent select,1,react.js file upload,1,Reactjs,4,reactJS CRUD,1,reactjs file upload,1,reactjs file upload app,1,reactjs file upload sample code,1,reactjs tutorial,1,read,1,register,1,registration,2,remove,1,request form node,1,reset,1,search,1,select,1,send activation email php,1,sending email using node js,1,server,1,Server-side data processing,1,shopping cart,1,shopping cart in node js,1,shopping cart javascript,1,shopping cart project in javascript,1,shopping cart using node js,1,shopping-cart,1,society management system in php,1,society management system php,1,society management system php source code,1,society management system project in php,1,society management system project php,1,source code,1,string,1,token,2,tutorial,8,update,2,using jwt for email verification,1,vanilla,1,vite,1,vitejs,1,vitejs crud app,1,web development,7,Web development guide,1,webslesson,2,what is jwt authentication,1,
ltr
item
kumpulan driver: How to make Contact Form in Node.js
How to make Contact Form in Node.js
https://i.ytimg.com/vi/oCmIQCCiRYA/hqdefault.jpg
https://i.ytimg.com/vi/oCmIQCCiRYA/default.jpg
kumpulan driver
https://kepsuk.blogspot.com/2023/03/how-to-make-contact-form-in-nodejs_24.html
https://kepsuk.blogspot.com/
http://kepsuk.blogspot.com/
http://kepsuk.blogspot.com/2023/03/how-to-make-contact-form-in-nodejs_24.html
true
6399859916032798219
UTF-8
Loaded All Posts Not found any posts VIEW ALL Readmore Reply Cancel reply Delete By Home PAGES POSTS View All RECOMMENDED FOR YOU LABEL ARCHIVE SEARCH ALL POSTS Not found any post match with your request Back Home Sunday Monday Tuesday Wednesday Thursday Friday Saturday Sun Mon Tue Wed Thu Fri Sat January February March April May June July August September October November December Jan Feb Mar Apr May Jun Jul Aug Sep Oct Nov Dec just now 1 minute ago $$1$$ minutes ago 1 hour ago $$1$$ hours ago Yesterday $$1$$ days ago $$1$$ weeks ago more than 5 weeks ago Followers Follow THIS PREMIUM CONTENT IS LOCKED STEP 1: Share to a social network STEP 2: Click the link on your social network Copy All Code Select All Code All codes were copied to your clipboard Can not copy the codes / texts, please press [CTRL]+[C] (or CMD+C with Mac) to copy Table of Content